

Prerequisites
Node.js 20 or newer. I'm using 24.
TypeScript. Not strictly required, but you'll want types when a tool's input schema changes shape three times while you're building it.
The official MCP TypeScript SDK. As of the time of writing, this is
@modelcontextprotocol/serverand@modelcontextprotocol/clientZod. For schema validation. The SDK takes one Zod schema per tool, prompt, or resource and does the rest: generates the JSON Schema the model sees, validates every call before your handler runs, infers your handler's argument types.
MCP Inspector, or a Code Agent. Inspector is a browser-based tool that launches your server and lets you call its tools by hand, to help debug your server. You should otherwise have an agent like Codex or Claude Code to confirm it actually works end to end.
What is "MCP"
Before Anthropic shipped MCP in late 2024, every AI product that wanted to talk to Slack, or your database, or GitHub, wrote its own custom connector, If you had five tools and three AI products, you had fifteen connectors.
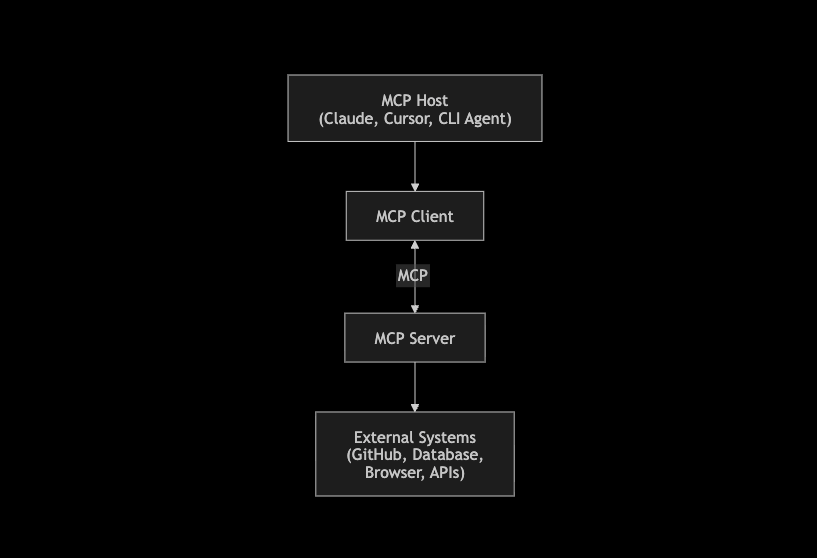
MCP (Model Context Protocol) is a standard interface for connecting AI applications to external tools, data, and services. It lets you build an MCP server once, expose the capabilities you want, and any MCP-compatible client, whether Claude, an IDE like Cursor, or a CLI agent, can discover and use those capabilities without requiring a separate custom integration for each client.
An MCP host is the AI application the user interacts with, such as Claude, Cursor, or another AI agent. The host contains an MCP client, which is responsible for communicating with MCP servers.
Simply put, An MCP server is a program that exposes capabilities that the AI application can use, and MCP defines the standard protocol that the client and server use to communicate.
Capabilities
A capability is something an MCP server makes available to an MCP client. The client understands how to interact with it because MCP defines a standard structure for each type of capability.
MCP defines three main types of capabilities that a server exposes to be used mid-conversation: tools, resources, and prompts. The protocol also defines a few newer/infrastructural capabilities:
Logging lets the server push log messages to the client over the protocol itself instead of stderr.
Completions lets the server suggest argument values as a user or client types them into a prompt or resource template.
Tasks(New) lets the server hand back a long-running operation the client can poll or subscribe to, instead of blocking on one request/response.
Experimental is a reserved namespace for vendor-specific extensions that haven't been finalized into the spec yet.
This article only covers the classic core three.
Tools are actions that the model can request the server to perform. They are typically used when the model needs to cause something to happen or retrieve information dynamically.
For example, an MCP server connected to GitHub might expose:
create_issue(title, description)
search_code(query)
get_pull_request(number)
If a user asks, "Find the authentication bug in this repository," the model can decide to call search_code() to look for relevant code. The model determines when the tool is needed and what arguments to provide.
Resources are data that an MCP server makes available for the client to read. Unlike tools, resources do not represent an action the model performs. They represent information that can be loaded into the model's context.
For example, a documentation MCP server could expose:
docs://authentication
docs://api/rate-limits
docs://database/schema
The host application can read one of these resources and provide its contents to the model as context. A resource could represent a document, configuration file, database schema, or another piece of application data.
Prompts are predefined instruction templates that help a user perform a particular task. They are usually selected explicitly by the user rather than discovered and invoked autonomously by the model.
For example, a code review MCP server could provide:
review_code
The prompt might accept a file or code snippet as an argument and produce a structured instruction such as:
Review this code for:
1. Bugs
2. Security issues
3. Performance problems
4. Maintainability concerns
Although this prompt example is over-simplified, I'm sure you get the gist. The user can select the review_code prompt, provide the relevant code, and then let the model work from the resulting instructions.
The simplest way to distinguish the three is:
Type | Represents | Typically controlled by |
|---|---|---|
Tool | An action the server can perform | Model |
Resource | Data the server can provide | Application/client |
Prompt | A reusable instruction template | User |
Now, imagine an MCP server for a database:
Tool:
query_database("SELECT * FROM users")

Resource:
database://schema

Prompt:
analyze_query(query)
The tool executes an operation, the resource provides information, and the prompt gives the model a predefined set of instructions for a task.
What we're building
A system info MCP server that reports on the machine it's running on. The server will provide one tool, one resource, and two prompts. You can change and customize them as you see fit
I picked this cause it needs almost nothing beyond Node's own os module, no API keys, no database, no external tooling, so the focus remains on understanding how MCP works. feel free to take it up a notch.
Getting our hands dirty
Project layout:
system-info-mcp/
├── package.json
├── tsconfig.json
└── src/
    └── index.ts
I'm keeping everything in one index.ts for this simplicity. In a larger MCP server, tools, resources, and prompts should typically be separated into their own modules as the project grows.
Step 1: Initialize the project
mkdir system-info-mcp && cd system-info-mcp
npm init -y
npm pkg set type=module
npm install @modelcontextprotocol/server zod
npm install -D typescript tsx @types/node
mkdir src
This sets up a plain npm project, adds the SDK and Zod as runtime dependencies, and adds TypeScript, tsx, and Node's type definitions as dev dependencies. The type=module setting configures the project to use ECMAScript modules, which is required for the SDK's module format.
Next create tsconfig.json:
{
  "compilerOptions": {
    "target": "ES2022",
    "module": "NodeNext",
    "moduleResolution": "NodeNext",
    "strict": true,
    "skipLibCheck": true,
    "outDir": "build"
  },
  "include": ["src"]
}
module and moduleResolution are set to NodeNext so TypeScript resolves modules using Node.js's ECMAScript module rules.
strict enables TypeScript's strict type checking, which helps catch incorrect types and argument shapes during development.
tsx allows the TypeScript source to be executed directly without compiling it first. This means you can run the server during development with:
npx tsx src/index.ts
Step 2: Create the server
Start src/index.ts with just enough to exist:
import { McpServer } from '@modelcontextprotocol/server';

function createServer(): McpServer {
  const server = new McpServer({ name: 'system-info', version: '0.0.1' });
  return server;
}
Step 3: The first tool, get_resource_usage
This tool will report the current resource usage of the machine running the MCP server.
import os from 'node:os';
import * as z from 'zod/v4';

server.registerTool('get_resource_usage', {
  description: 'Report current CPU and memory usage',
  inputSchema: z.object({})
}, async () => {
  const cpus = os.cpus();
  const totalMem = os.totalmem();
  const freeMem = os.freemem();

  await new Promise(r => setTimeout(r, 100));

  const usage = cpus.reduce((sum, cpu, i) => {
    const now = os.cpus()[i].times;
    const total = Object.values(now).reduce((a, b) => a + b);
    const idle = now.idle;
    const prev = Object.values(cpu.times).reduce((a, b) => a + b);
    return sum + (1 - (idle - cpu.times.idle) / (total - prev)) * 100;
  }, 0) / cpus.length;

  return {
    content: [{
      type: 'text',
      text: JSON.stringify({
        cpu: `${usage.toFixed(1)}%`,
        memory: `${(((totalMem - freeMem) / totalMem) * 100).toFixed(1)}%`,
        uptime: `${(os.uptime() / 3600).toFixed(1)}h`
      })
    }]
  };
});
The registerTool method registers a new tool with the MCP server. It takes three main arguments:
Tool name:
get_resource_usageConfiguration: the description and input schema
Handler: the function that executes when the tool is called
Step 4: One resource, system://specs
server.registerResource(
  'system-specs',
  'system://specs',
  {
    title: 'System Specifications',
    description: 'Static hardware and OS details for this machine',
    mimeType: 'application/json'
  },
  async uri => {
    const cpus = os.cpus();
    const specs = {
      platform: os.platform(),
      arch: os.arch(),
      release: os.release(),
      hostname: os.hostname(),
      cpuModel: cpus[0]?.model ?? 'unknown',
      cpuCount: cpus.length,
      totalMemoryGB: (os.totalmem() / 1024 ** 3).toFixed(2)
    };
    return { contents: [{ uri: uri.href, mimeType: 'application/json', text: JSON.stringify(specs, null, 2) }] };
  }
);
registerResource takes a resource name, a URI, its configuration, and a handler that returns the resource contents.
The system://specs URI is not a real network address. MCP uses URIs to uniquely identify resources, and the scheme can be application-specific.
Step 5: The prompts, system_health_audit and check_game_compatibility
server.registerPrompt(
  'system_health_audit',
  {
    title: 'System Health Audit',
    description: 'Read system specs and current resource usage, then flag anything unhealthy',
    argsSchema: z.object({})
  },
  () => ({
    messages: [{
      role: 'user' as const,
      content: {
        type: 'text' as const,
        text: [
          'Read the system://specs resource.',
          'Then call get_resource_usage.',
          'Using both, write a short health report: flag memory usage over 85%',
          'and CPU usage that stays high.',
          'End with one line: healthy, watch, or investigate.'
        ].join(' ')
      }
    }]
  })
);
The second prompt demonstrates how a prompt can accept arguments and instruct the model to combine information from the MCP server with information available through another capability
server.registerPrompt(
  'check_game_compatibility',
  {
    title: 'Check Game Compatibility',
    description: "Audit this machine's specs against a game's system requirements",
    argsSchema: z.object({
      game: z.string().describe('Name of the game to check, e.g. "Baldur\'s Gate 3"')
    })
  },
  ({ game }) => ({
    messages: [{
      role: 'user' as const,
      content: {
        type: 'text' as const,
        text: `Read the system://specs resource for this machine's hardware. Then search the web for ${game}'s minimum and recommended system requirements. Compare CPU, RAM, and GPU (if listed) against this machine, and give a verdict: can run on recommended settings, can run on minimum settings only, or cannot run. Name the specific bottleneck if there is one.`
      }
    }]
  })
);
Step 6: Serve it over stdio
MCP supports multiple transports. For this project, we will use stdio, which uses the process's standard input and output streams for communication.
The host starts the MCP server as a child process and communicates with it through stdin and stdout. No network connection or port is required.
import { serveStdio } from '@modelcontextprotocol/server/stdio';

const handle = serveStdio(createServer);

console.error('system-info MCP server running on stdio');

process.on('SIGINT', () => {
  void handle.close();
});
serveStdio connects the createServer factory to the stdio transport and starts handling MCP messages.
When the process receives SIGINT, handle.close() shuts down the server cleanly.
There is one important rule when using stdio: do not write logs to **stdout**.
MCP uses stdout for its protocol messages. A console.log() can therefore write text into the same stream as the JSON-RPC messages and corrupt the communication between the host and server.
Use console.error() for debugging and logging instead, or the SDK's logging capability, which sends log messages to the client over the protocol itself instead of stderr:
const server = new McpServer(
  { name: 'system-info', version: '0.0.1' },
  { capabilities: { logging: {} } }
);

server.sendLoggingMessage({ level: 'info', data: 'server started' });
Declaring logging: {} in the server's capabilities tells the client to expect notifications/message events, then sendLoggingMessage pushes one whenever you call it. The host can surface these in its own UI instead of you having to tail stderr by hand.
Step 7: Test it with MCP Inspector
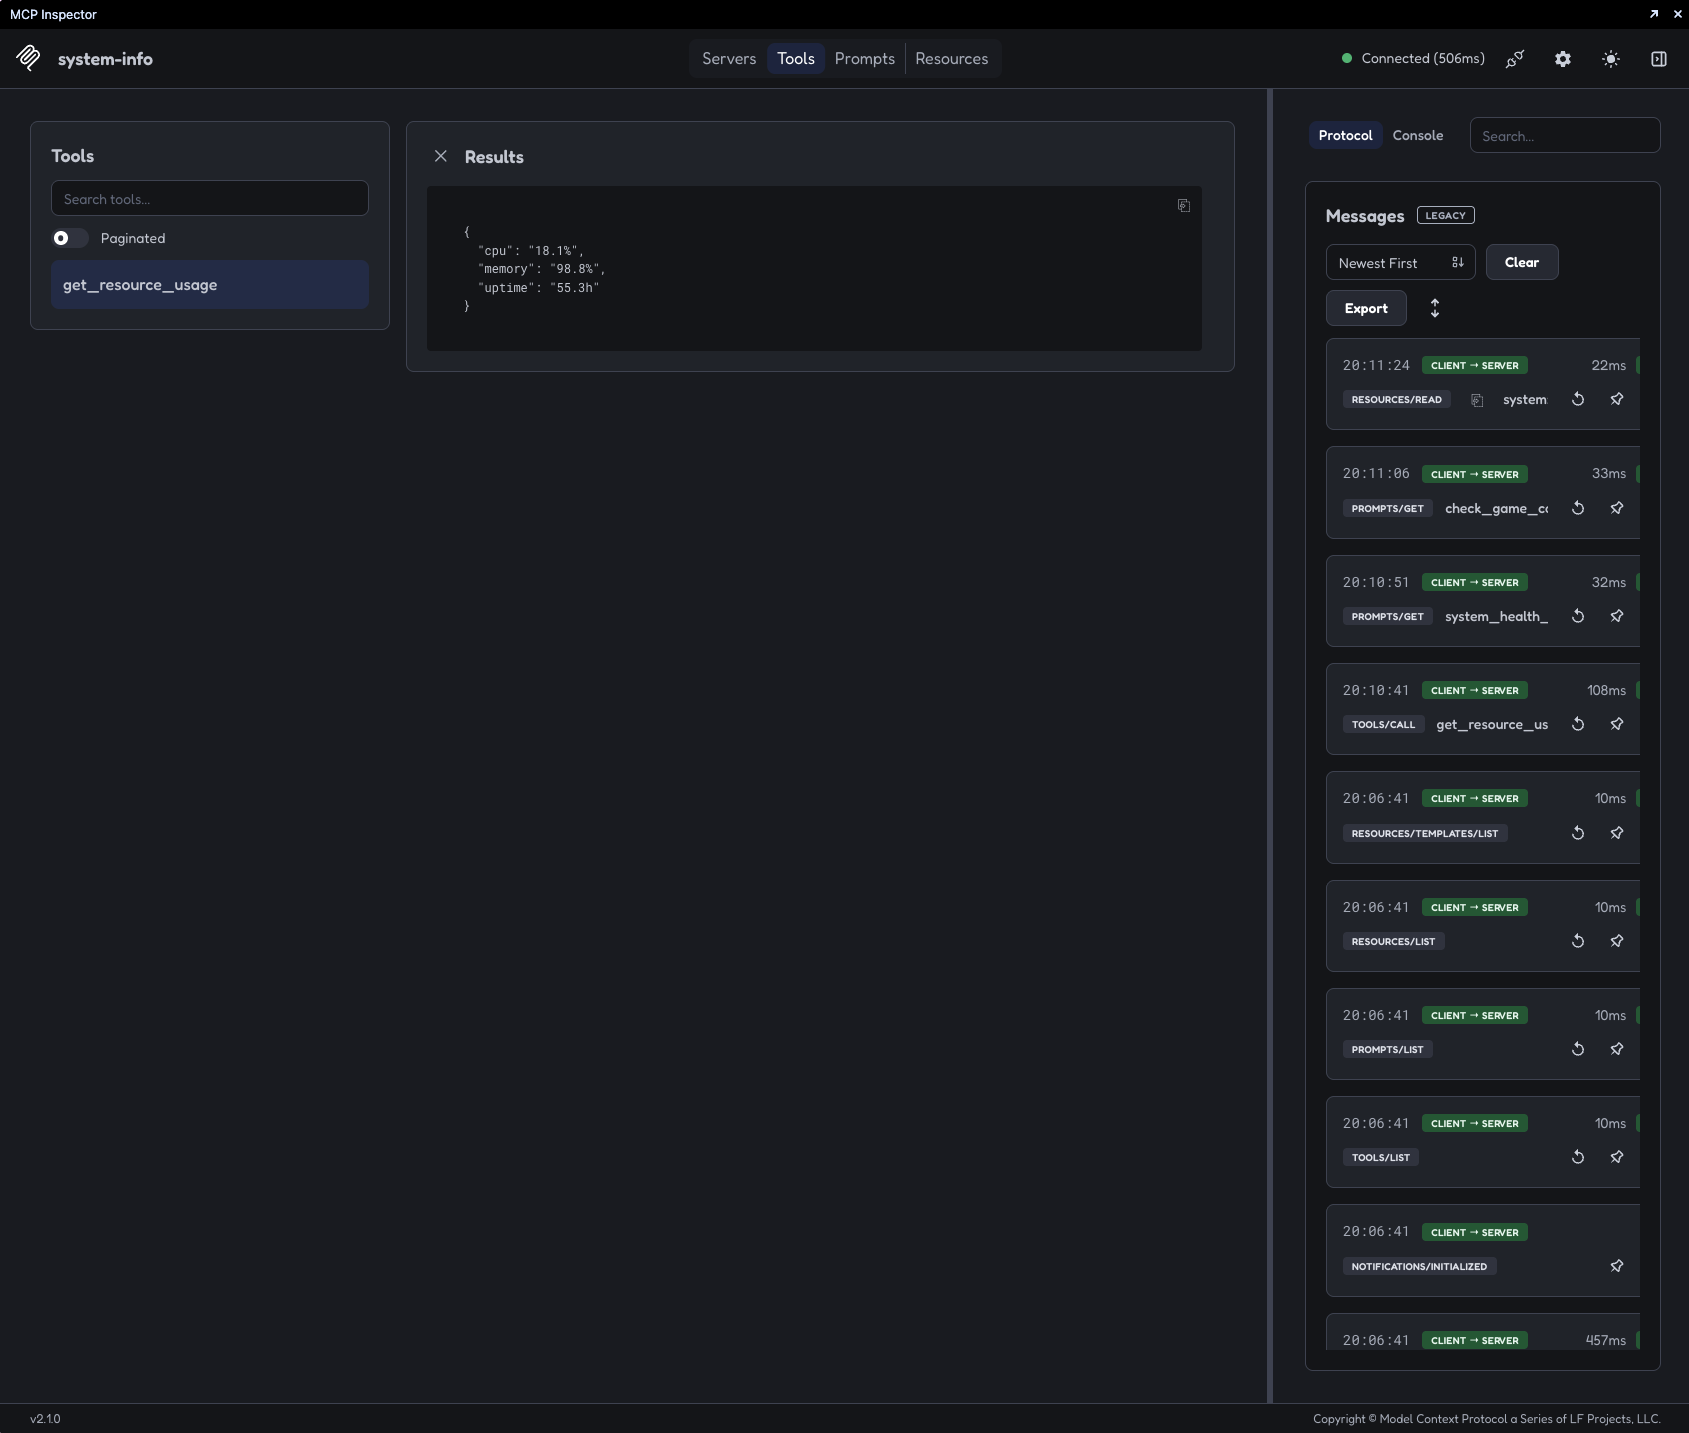
The MCP Inspector provides a convenient way to test an MCP server before connecting it to an AI host.
npx @modelcontextprotocol/inspector npx tsx src/index.ts
Inspector starts the MCP server as a child process and provides a browser interface for interacting with it, from there you should be able to:
Connect to the server.
Open the Tools section and run
get_resource_usage.Open the Resources section and read
system://specs.Open the Prompts section and run
system_health_audit.
Why stdio, not Streamable HTTP
For this project, stdio is the simplest and most appropriate transport as the MCP server is completly local. the data source its pulling is from the machine where its running
Streamable HTTP on the other hand, is useful when the MCP server needs to run as a network service that multiple clients can connect to. This makes it a better fit for externeal/remotely hosted services, However, It also introduces concerns that do not exist with local stdio servers, such as authentication, session management, and request security.
Wiring it into a host
Once the setup works with Inspector, it can be connected to an MCP host like cluade code . Many MCP hosts use a configuration file containing an mcpServers object. The exact configuration format and file locations sometimes depend on the host.
{
  "mcpServers": {
    "system-info": {
      "command": "npx",
      "args": ["tsx", "/absolute/path/to/system-info-mcp/src/index.ts"]
    }
  }
}
The system-info entry tells the host how to start the MCP server.
The complete server
You can also clone this on github here: github.com/Topman-14/system-info-mcp.
import { McpServer } from '@modelcontextprotocol/server';
import { serveStdio } from '@modelcontextprotocol/server/stdio';
import os from 'node:os';
import * as z from 'zod/v4';

function createServer(): McpServer {
  const server = new McpServer({ name: 'system-info', version: '0.0.1' });

  server.registerTool('get_resource_usage', {
    description: 'Report current CPU and memory usage',
    inputSchema: z.object({})
  }, async () => {
    const cpus = os.cpus();
    const totalMem = os.totalmem();
    const freeMem = os.freemem();

    await new Promise(r => setTimeout(r, 100));

    const usage = cpus.reduce((sum, cpu, i) => {
      const now = os.cpus()[i].times;
      const total = Object.values(now).reduce((a, b) => a + b);
      const idle = now.idle;
      const prev = Object.values(cpu.times).reduce((a, b) => a + b);
      return sum + (1 - (idle - cpu.times.idle) / (total - prev)) * 100;
    }, 0) / cpus.length;

    return {
      content: [{
        type: 'text',
        text: JSON.stringify({
          cpu: `${usage.toFixed(1)}%`,
          memory: `${(((totalMem - freeMem) / totalMem) * 100).toFixed(1)}%`,
          uptime: `${(os.uptime() / 3600).toFixed(1)}h`
        })
      }]
    };
  });

  server.registerResource(
    'system-specs',
    'system://specs',
    {
      title: 'System Specifications',
      description: 'Static hardware and OS details for this machine',
      mimeType: 'application/json'
    },
    async uri => {
      const cpus = os.cpus();
      const specs = {
        platform: os.platform(),
        arch: os.arch(),
        release: os.release(),
        hostname: os.hostname(),
        cpuModel: cpus[0]?.model ?? 'unknown',
        cpuCount: cpus.length,
        totalMemoryGB: (os.totalmem() / 1024 ** 3).toFixed(2)
      };
      return { contents: [{ uri: uri.href, mimeType: 'application/json', text: JSON.stringify(specs, null, 2) }] };
    }
  );

  server.registerPrompt(
    'system_health_audit',
    {
      title: 'System Health Audit',
      description: 'Read system specs and current resource usage, then flag anything unhealthy',
      argsSchema: z.object({})
    },
    () => ({
      messages: [{
        role: 'user' as const,
        content: {
          type: 'text' as const,
          text: [
            'Read the system://specs resource.',
            'Then call get_resource_usage.',
            'Using both, write a short health report: flag memory usage over 85%',
            'and CPU usage that stays high.',
            'End with one line: healthy, watch, or investigate.'
          ].join(' ')
        }
      }]
    })
  );

  server.registerPrompt(
    'check_game_compatibility',
    {
      title: 'Check Game Compatibility',
      description: "Audit this machine's specs against a game's system requirements",
      argsSchema: z.object({
        game: z.string().describe('Name of the game to check, e.g. "Baldur\'s Gate 3"')
      })
    },
    ({ game }) => ({
      messages: [{
        role: 'user' as const,
        content: {
          type: 'text' as const,
          text: `Read the system://specs resource for this machine's hardware. Then search the web for ${game}'s minimum and recommended system requirements. Compare CPU, RAM, and GPU (if listed) against this machine, and give a verdict: can run on recommended settings, can run on minimum settings only, or cannot run. Name the specific bottleneck if there is one.`
        }
      }]
    })
  );

  return server;
}

const handle = serveStdio(createServer);
console.error('system-info MCP server running on stdio');

process.on('SIGINT', () => {
  void handle.close();
});
Conclusion
The system information server we built is intentionally small, but it demonstrates the core concepts behind MCP. We built at least one of each capability in scope and connected the server to a host using the stdio transport.
From here, an MCP server can become much more sophisticated. You can expose additional capabilities, add authentication, support other transports, or return structured data that applications can consume. Popular MCP servers such as GitHub, Figma, PostgreSQL, Slack, Google Drive, and Linear show how far these concepts are taken.